close

April 2026

Fashion

Engineering Pilates Apparel: Why the Technical Demands of Mat and Reformer Work Require Different Fabric Properties Than Yoga

The activewear market treats pilates and yoga apparel as essentially interchangeable categories, presenting the same leggings, tops and shorts for both disciplines with minimal acknowledgement of the genuinely different physical demands that pilates singapore and yoga place on the clothing worn during practice. For practitioners who attend both disciplines casually, this interchangeability is largely adequate. The performance differences between discipline-appropriate and discipline-inappropriate apparel are small enough that occasional practitioners are unlikely to notice them. For serious pilates practitioners who attend multiple sessions per week, who work on reformer equipment and mat exercises that place specific and unusual demands on their clothing, and who have developed the movement awareness to notice when apparel is impeding their practice, the technical differences between pilates-optimised and general yoga activewear are meaningful.

Understanding what pilates practice specifically demands from apparel, and how those demands differ from yoga’s requirements, is the foundation for building a kit that genuinely supports the practice rather than simply covering the body during it.

The Reformer Environment and Its Unique Clothing Challenges

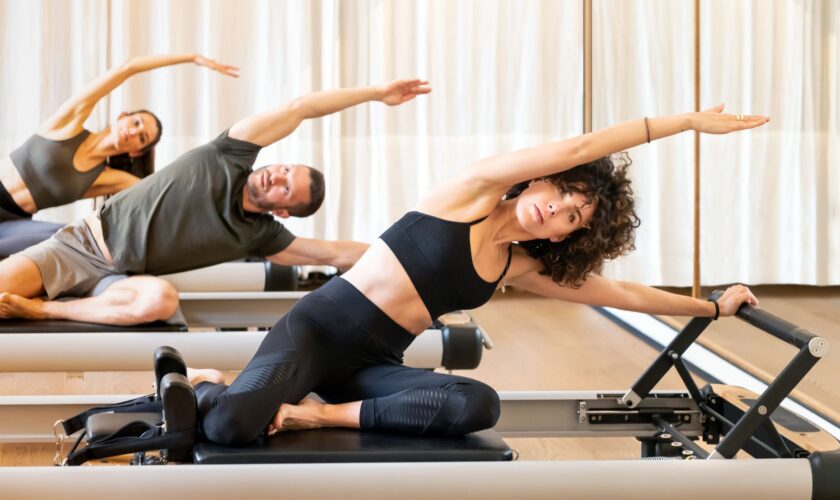
Reformer pilates creates clothing challenges that have no equivalent in mat pilates, yoga or most other group fitness formats, because the reformer machine itself interacts with the clothing in ways that floor-based exercise does not.

The carriage surface of the reformer, where the practitioner stands, sits, kneels or lies during various exercises, creates friction and pressure forces against clothing that vary considerably across different exercise positions. In foot bar work, the feet are often bare, but the rest of the body may be in contact with the carriage surface, and clothing that rides up, compresses uncomfortably or creates pressure points under body weight produces distracting discomfort that competes with the internal awareness that pilates requires.

The straps and handles of the reformer create a different interaction concern. Loose or oversized clothing can catch on the spring-loaded components of the machine, creating a safety concern in exercises where rapid spring release is part of the movement pattern. Clothing that rides up during overhead arm work or that does not maintain coverage during inverted or semi-inverted exercise positions creates both a distraction and a practical modesty concern in group class settings.

The temperature environment of reformer pilates differs from most other studio contexts. The reformer’s spring resistance mechanisms create a specific work demand that generates significant localised muscular exertion in the legs, hips and core without the cardiovascular intensity that produces the heavy full-body perspiration of a heated yoga class or a high-intensity cardio format. The result is a temperature regulation challenge that sits between the needs of a hot yoga class and a yin yoga session: enough exertion to require some moisture management, but not enough to make minimal coverage the priority that hot yoga demands.

The Grip Dimension: Why Pilates Needs Different Solutions Than Yoga

Grip in pilates occurs in different anatomical locations and from different mechanisms than grip in yoga, and this difference has direct implications for the clothing design features that are most useful.

In yoga, the primary grip concern is the interface between hands, feet and a mat surface during weight-bearing and balance postures. In reformer pilates, the grip concerns are more varied: the contact between the feet and the reformer footbar, the contact between the body and the carriage surface in various exercise positions, and the contact between the hands and the straps or handles of the machine.

The footbar contact issue is addressed by most practitioners through bare feet, which provide the most reliable feedback and grip on this surface. The carriage contact issue is where clothing choice becomes relevant: smoother fabrics that slide over the carriage surface are better suited to exercises where some movement between body and carriage is intended, while fabrics with more textured surfaces that provide grip are better suited to exercises where maintaining position against the carriage is the priority.

For mat pilates work, the hand and knee contact concerns that reformer work does not create become relevant. Mat pilates involves a higher proportion of kneeling and four-point support positions than most yoga formats, creating a sustained pressure on the knee surface that thin or inadequately padded leggings makes uncomfortable over extended hold times. The contact between palms and mat surface in four-point positions requires the same grip-friendly fabric considerations that yoga hand positioning demands.

Length, Coverage and the Pilates Movement Range

The ranges of motion that pilates exercises move through, and the body positions in which these ranges are achieved, create specific coverage requirements that differ in meaningful ways from yoga’s.

Pilates places considerable emphasis on hip flexion through a wide range, from the gentle double knee to chest positions of early clinical exercises to the strong hip flexion of teaser variations and advanced rolling exercises. In high hip flexion positions, leggings with inadequate rise height or tops without sufficient length create coverage gaps that are both practically uncomfortable and socially inconvenient in group class settings.

The supine positions that constitute a significant proportion of both mat and reformer pilates work create a different coverage challenge from the standing and downward-facing positions that dominate many yoga classes. Leggings that maintain full coverage and waistband position in upright work may reveal the lower back or shift the waistband position uncomfortably in extended supine positions where the pelvis is moving through ranges of posterior and anterior tilt. High-waisted designs with waistbands that maintain their position through pelvic movement are more consistently appropriate for the pilates context than standard waistband designs.

The arm position range of pilates includes a higher proportion of exercises with arms extended overhead or out to the side than is typical in most yoga formats. Tops that are designed primarily for forward-folding and arm-bearing positions may ride up significantly during overhead arm work, particularly in the reformer strap exercises that regularly bring the arms into full overhead extension. Longer crop tops and tucked or fitted designs that maintain their position through overhead movement address this issue more effectively than shorter tops with elasticated hems that ride up freely.

Compression Intensity and Its Pilates-Specific Application

The compression properties of pilates apparel require a more nuanced consideration than the binary compressed or uncompressed choice that most activewear marketing implies.

High compression in the leg and hip regions is appropriate and beneficial for several pilates applications, including the proprioceptive feedback that compression provides during the subtle hip and pelvis positioning that forms the foundation of pilates technique, and the muscular support that compression provides during the sustained isometric work of many classical exercises. However, high compression around the abdomen and lower rib cage is specifically contraindicated for the deep diaphragmatic breathing that pilates breathing technique requires. Waistbands or tops that apply high compression to the lower thorax restrict the rib cage expansion that full diaphragmatic breathing demands, producing a direct conflict between the compression garment’s function and the exercise’s intended effect.

The design solution to this tension is selective compression: high compression in the leg and hip regions where proprioceptive and muscular support benefit is clear, transitioning to minimal compression in the lower rib cage and abdominal regions where breathing freedom is the priority. Several performance apparel manufacturers have begun designing specifically for this requirement, producing pilates-specific leggings and tops with graduated compression profiles that address the discipline’s unique combination of stability and breathing freedom needs.

Yoga Edition serves a pilates community whose movement awareness and practice sophistication have developed to a level where the performance details of their apparel choices are genuinely relevant to the quality of their practice, reflecting the broader principle that serious engagement with pilates extends naturally into the tools and equipment that support the depth of the discipline.

read more
Jewelry

How to Layer Necklaces Like a Professional Stylist

The art of necklace layering is one of the most effective ways to transform a simple outfit into a curated fashion statement. While it might appear as though professional stylists simply toss on a handful of gold chains and achieve a perfect look, the reality is far more calculated. Effective layering requires a keen understanding of proportions, textures, and focal points. In 2026, the trend has evolved from the delicate minimalism of previous years into a more expressive, “more is more” philosophy that celebrates personal history and architectural contrast.

Mastering this skill allows you to breathe new life into your existing jewelry collection. It is about creating a visual narrative around your neckline that reflects your personality while maintaining a sense of intentionality. Whether you are dressing up a basic white t-shirt or adding a touch of rebellion to a formal evening gown, the following principles will help you curate a necklace stack that looks expensive, balanced, and professionally styled.

The Rule of Three: Creating a Visual Hierarchy

The most fundamental principle used by professional stylists is the Rule of Three. While you can certainly layer two necklaces or even five, three is widely considered the magic number for achieving perfect balance. This structure creates a beginning, a middle, and an end to your jewelry story.

The first layer is typically a short, delicate piece that sits high on the collarbone. This could be a simple 14-inch choker or a fine satellite chain. Its purpose is to frame the neck and provide a starting point for the eye. The second layer is the “bridge.” Usually sitting around 16 to 18 inches, this necklace should have slightly more weight or a different texture than the first. The third layer is the “anchor” or the focal point. This is often a 20- to 24-inch chain with a significant pendant, coin, or medallion. By staggering the lengths in this way, you ensure that each piece has its own breathing room and that the stack doesn’t look like a cluttered mess.

Playing with Texture and Chain Weights

The secret to a sophisticated layer is contrast. If you wear three identical flat gold chains of different lengths, the look can appear flat and repetitive. Professional stylists look for ways to mix textures to create depth. This is achieved by combining different chain styles within a single stack.

  • Snake Chains: These offer a smooth, liquid-like sheen that catches light evenly.

  • Paperclip Chains: With their elongated links and industrial feel, these add a modern, architectural edge.

  • Rope and Curb Chains: These provide a rugged, twisted texture that creates a beautiful shadow play against the skin.

  • Beaded or Pearl Strands: Incorporating a strand of small pearls or colorful gemstones adds an organic element that breaks up the metallic monotony.

When selecting your pieces, try to pair a heavy, chunky chain with a very fine, dainty one. This juxtaposition makes the delicate piece look more feminine and the heavy piece look more intentional. The goal is to have enough variety that the eye is constantly moving from one interesting detail to the next.

Managing the Focal Point

Every successful necklace stack needs a “hero” piece. This is the element that draws the initial attention and anchors the rest of the look. Without a focal point, the layers can feel aimless. Most stylists choose a pendant for the longest layer to serve this purpose.

A popular choice in 2026 is the use of vintage coins, astrological medallions, or raw-cut gemstones. When choosing your hero piece, consider the neckline of your clothing. If you are wearing a deep V-neck, a long, vertical pendant will elongate your frame. If you are wearing a crew neck, a larger, rounder medallion that sits on top of the fabric can provide a striking contrast. Once you have chosen your hero, every other necklace in the stack should be selected to support and enhance it, rather than compete with it.

The Technical Challenge: Preventing the Tangle

The biggest practical frustration with layering is the inevitable tangling of chains. As you move throughout the day, fine chains tend to wrap around each other, turning a beautiful stack into a knotted bird’s nest. Professional stylists use a few tricks to mitigate this issue.

First, pay attention to the weights of your necklaces. If you layer two extremely lightweight chains together, they will almost certainly tangle. By mixing a heavier chain with a lighter one, the weight of the larger links helps keep the finer chain in its place. Second, consider the clasp. Many stylists now recommend using a “necklace detangler” or a multi-strand clasp. This is a small metal bar that your necklaces clip into, which then clips onto the back of your neck as a single unit. This keeps the spacing consistent and prevents the chains from rotating around your neck. Finally, mixing different metal finishes can sometimes help; the varying surface frictions of different alloys can occasionally reduce the “sliding” effect that leads to knots.

Mixing Metals and Incorporating Color

The old rule that you must stick to either all gold or all silver is officially dead. In fact, mixing metals is one of the hallmarks of a contemporary, high-fashion look. The key to mixing metals like a pro is to do it with confidence and repetition.

If you want to mix silver and gold, make sure you have at least two of each metal in your stack, or choose a “bridge” piece that features both tones. This makes the mix look deliberate rather than accidental. Additionally, don’t be afraid to pull in a pop of color through beads, enamel, or small gemstones. A tiny turquoise bead on a middle layer can act as a beautiful disruptor in an otherwise all-gold stack, giving the jewelry a more “collected over time” and soulful feel.

Proportions and the Silhouette

The final consideration is how the jewelry interacts with your physical proportions and your outfit. Layering is not just about the necklaces themselves; it is about the “V” shape they create. This visual “V” has a slimming and lengthening effect on the torso.

If you have a shorter neck, focus on longer, daintier layers that draw the eye downward. If you have a longer neck, you can afford to experiment with thicker chokers and high-sitting collars. Furthermore, consider the “weight” of your outfit. A heavy wool sweater can handle chunky, bold layers, whereas a delicate silk camisole might be overwhelmed by heavy hardware and is better suited to fine, shimmering threads of gold.

http://googleusercontent.com/image_collection/image_retrieval/1486440741931663525

Frequently Asked Questions

What is the best way to store layered necklaces so they don’t tangle in the jewelry box?

The most effective way to store necklaces is to hang them individually on hooks. If you must store them flat, thread each chain through a drinking straw and clasp it; this prevents the chain from knotting back on itself. For travel, laying them between two sheets of plastic wrap can also keep them immobile and tangle-free.

Can I layer necklaces with different types of metals and finishes?

Yes, mixing metals like yellow gold, rose gold, and sterling silver is a major trend. To make it look cohesive, try to find one “mixed-metal” piece that contains both colors to act as a bridge, or alternate the metals throughout the stack so the distribution looks balanced.

How many necklaces is too many for one look?

While there are no hard rules, most stylists suggest capping a daily look at four or five layers. Beyond that, the jewelry can become physically heavy and the visual “noise” may start to detract from your face rather than framing it. For a minimalist approach, two is sufficient; for a statement, three to four is the sweet spot.

Should all my necklaces be the same style, or can I mix vintage and modern?

Mixing styles is highly encouraged. A vintage locket inherited from a grandmother looks incredibly chic when paired with a modern, industrial paperclip chain. This blend of “old and new” gives your jewelry a personality that cannot be bought in a single pre-packaged set.

How do I choose the right lengths for my necklaces?

Standard lengths usually go in increments of two inches: 14, 16, 18, and 20 inches. If your necklaces are all the same length, you can buy “chain extenders” to add one or two inches to a specific piece, allowing you to create the necessary staggered effect for a clean layer.

Is it okay to layer necklaces over a turtleneck?

Absolutely. Layering over a solid-colored turtleneck is one of the best ways to showcase your jewelry. In this case, you can opt for slightly thicker chains and larger pendants, as the fabric provides a stable, monochromatic canvas that makes the metal pop.

How do I stop my necklaces from spinning so the clasps end up in the front?

This usually happens because the necklaces are too light or the pendants are not heavy enough to anchor them. You can try attaching a small, heavy “extender” to the back of the clasp to act as a counterweight, which helps keep the clasp at the nape of your neck.

read more